
As an Amazon Associate, we earn from qualifying purchases. This means we may receive a small commission at no extra cost to you if you buy through our links. All recommended products are available on Amazon UK.
How to Repair Veneer Blisters: The Ultimate Step-by-Step Guide
You finally found the perfect mid-century modern credenza, but right in the centre of the top sits an ugly, raised bubble of wood. Learning how to Repair Veneer Blisters is a mandatory rite of passage for anyone tackling antique furniture restoration. Moisture, heat, age, and failing adhesives routinely cause these unsightly bumps. Fortunately, you do not need to strip the entire piece to fix them.
Quick Answer: The Bottom Line on Flattening Blisters
To repair veneer blisters successfully, you must first identify the underlying glue. For pre-1950s antique furniture, place a damp cloth over the bubble and apply a medium-hot iron to reactivate the traditional hide glue. For modern furniture built with synthetic adhesives, use a sharp scalpel to slit the blister with the grain. Inject high-quality PVA wood glue using a syringe, then clamp it flat using a heavy wooden caul and wax paper until fully cured.
Identifying the Glue: Antique vs. Modern Furniture
You cannot effectively treat a blister without understanding what holds the wood down. Applying an iron to a modern synthetic glue will do absolutely nothing except burn your table.
Pre-1950s Furniture (Hide Glue)
Older pieces rely almost exclusively on hot hide glue (traditional). This animal-based protein adhesive is incredibly resilient, but it is also thermoplastic. This means it softens and melts when exposed to heat and moisture. If your piece predates the 1950s, the original glue is likely still sitting right beneath the bubble, just waiting for reactivation.
Post-1950s Furniture (PVA & Synthetic Glues)
Modern delamination requires a totally different approach. Mid-century modern (MCM) repair usually involves synthetic aliphatic resins or PVA wood glue (modern). These glues cure through a permanent chemical cross-linking process. You cannot melt them. Once they fail, you must physically introduce new adhesive beneath the lifting timber.
Method 1: The Heat Reactivation Technique to Repair Veneer Blisters
This technique is strictly for antiques. When the old glue has simply dried out and detached, ironing veneer is the cleanest, least invasive solution.
Step 1: Preparation and Protection
Never place a hot iron directly onto finished timber. You will instantly scorch the wood and destroy the surrounding clear coat. Instead, fold a clean, slightly damp cotton cloth and lay it squarely over the blister. The dampness generates the steam required to soften the ancient hide glue.
Step 2: Applying the Iron
Set a standard household iron to a medium heat setting. Press it firmly onto the damp cloth directly over the blister. Hold it still for about 10 to 15 seconds. Check the blister. The heat will travel through the timber, melting the old adhesive beneath. Do not let the iron sit long enough to burn the cloth.
Step 3: The “Veneer Hammer” Press
Remove the iron and the cloth immediately. While the glue is still piping hot, take a traditional veneer hammer (or a smooth, flat block of hard wood) and firmly press the blister flat. Rub the block back and forth over the area as the glue cools. The cooling process locks the reactivated glue back onto the core substrate.
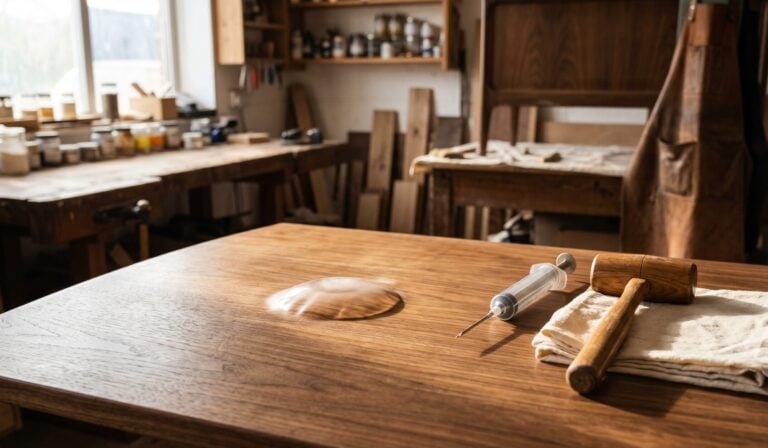
Method 2: The Slit & Inject Technique (For Stubborn or Modern Blisters)
If the heat method fails, or you are working with a modern piece experiencing severe wood veneer bubbling, you must perform minor surgery.
Step 1: Slicing the Blister Safely
Slicing a veneer blister is terrifying but necessary. Take a razor-sharp utility knife / scalpel and make a single, clean slit straight through the centre of the bubble. Crucial rule: You must slice exactly parallel with the wood grain. Cutting across the grain severs the fibres, leaving a glaring, highly visible scar that will absorb stains unevenly later.
Step 2: Cleaning the Debris
The blister likely formed because dirt, old glue crumbs, or moisture separated the layers. Slide a thin metal palette knife gently under the flaps. Carefully scrape away the crusty debris. If you leave grit underneath, the veneer will never sit perfectly flat again.
Step 3: Injecting Glue to Repair Veneer Blisters
Now, you must deliver fresh adhesive into the void.
- Fill a professional veneer glue syringe with either liquid hide glue or a premium PVA.
- Slide the needle deep under one side of the slit.
- Slowly squeeze the plunger while dragging the needle back out, ensuring the adhesive reaches the absolute edges of the void.
- Repeat the process on the other side of the slit.
Step 4: The Roll-Out
Once you finish injecting glue under veneer, gently press down on the blister starting from the outside edges and moving towards your slit. This forces the adhesive into every microscopic crevice and pushes the excess glue out through the cut. Wipe this excess away immediately with a damp rag before it dries and ruins your surface.
The Secret to Success: Proper Clamping (The Caul Method)
The most common amateur mistake in re-gluing wood veneer is clamping a block directly onto the blister. The glue will seep out, cure, and permanently weld the clamp block to your beautiful dining table.
Building a Clamping Sandwich
To successfully master flattening warped wood and seating new glue, you must distribute the pressure evenly using clamping cauls. The Wood Magazine guide on veneering routinely stresses the absolute necessity of non-stick barriers during glue-ups.
| Layer Order | Material Needed | Purpose |
|---|---|---|
| Bottom Layer (The Table) | The slit, glued blister | The area being repaired. |
| Layer 2 (The Barrier) | Wax Paper or PTFE Sheet | Stops seeping glue from sticking to your tools. |
| Layer 3 (The Caul) | Thick, flat MDF or Plywood block | Distributes clamp pressure evenly across the blister. |
| Top Layer (Pressure) | C-Clamps or Heavy Weights (e.g., paint tins) | Provides the mechanical force until the glue cures. |
What to Do If the Veneer is Brittle and Cracked?
Sometimes, lifting veneer edges are so dry they threaten to snap like a crisp the moment you press on them.
Softening the Wood
Before attempting to clamp brittle timber, you must rehydrate it. Mix a solution of two parts water to one part glycerine. Lightly mist the surface of the dry blister. The glycerine acts as a plasticiser, soaking into the wood fibres and making them temporarily pliable. This dramatically reduces the risk of the timber shattering under the pressure of your clamps.
People Also Ask (PAA)
Can you fix bubbling veneer with an iron?
Yes, if the furniture is antique and was built using traditional hide glue. Place a damp cotton cloth over the bubble and apply a medium-hot iron. The heat and steam will penetrate the wood to melt and reactivate the old glue. Remove the iron and press the bubble flat with a hard block while it cools.
What is the best glue to repair wood veneer?
For valuable antiques, [Old Brown Liquid Hide Glue] is the industry standard because it remains fully reversible for future conservators. For modern pieces or heavy-use kitchen cabinets, a high-quality PVA like [Titebond II] injected via a [Veneer Glue Syringe] offers the strongest, most resilient hold.
How do you fix water damaged swollen MDF under veneer?
If the internal MDF substrate has swollen from a water spill, simply gluing the water damaged veneer down will not fix the physical lump. You must slice the veneer, peel it back carefully, and mechanically excavate the swollen MDF dust using a chisel. Fill the excavated void with a hard, two-part wood filler, sand it perfectly flat, and then re-glue the veneer over the top.
Conclusion & Next Steps
Executing a flawless repair on a bubbling tabletop requires patience, not brute force. Whether you are using steam to reactivate a Victorian table or a syringe to save a Danish modern sideboard, respecting the timber and mastering the caul clamping method guarantees success. If your piece needs further attention after the glue has cured, be sure to review our comprehensive tutorial on refinishing wood furniture after repairs to blend your handiwork perfectly.