
As an Amazon Associate, we earn from qualifying purchases. This means we may receive a small commission at no extra cost to you if you buy through our links. All recommended products are available on Amazon UK.
The Ultimate Guide to Wood Grain Filler for Walnut: Achieving a Glass-Smooth Finish
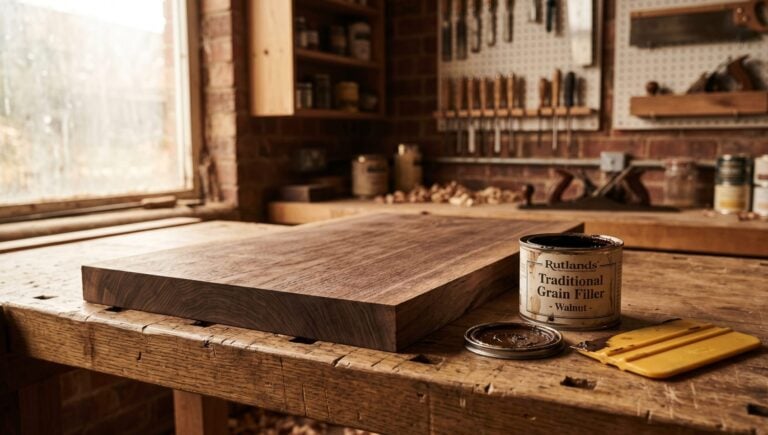
You spend days carefully applying a high-gloss topcoat to a dark timber table, only to watch it shrink into the deep pores a week later. Finding the right Wood Grain Filler for Walnut is the only way to prevent this pitted, “orange peel” disaster. Unlike maple or cherry, walnut demands an extra preparatory step. I have ruined enough expensive timber in my workshop to know that skipping this stage guarantees a compromised reflection.
Quick Answer: The Bottom Line on Filling Walnut Pores
To achieve a mirror-like “piano finish” on walnut, you must pack the open cellular pores before applying your topcoat. Apply a protective sanding sealer first. Then, use a tinted oil-based grain filler or a fast-drying water-based grain filler across the timber. Scrape off the excess with a squeegee, rub it down with coarse burlap, and sand the surface completely flat once cured. This stops varnishes from sinking and ruining the optical clarity of the finish.
Why Does Walnut Actually Need a Grain Filler?
Understanding the biology of the timber dictates exactly how you should finish it.
The Anatomy of Open-Grain Woods
Black walnut is an open-grain wood. It acts like a bundle of microscopic drinking straws. When the tree is milled, these massive vascular channels are sliced open, leaving deep trenches across the face of the board. Unlike a closed-grain wood like maple, which is naturally dense and tight, the deep walnut pores aggressively swallow whatever liquid you apply to them.
The “Sunken Finish” Dilemma
If you apply lacquer or polyurethane directly over bare walnut, the chemicals will bridge the gaps initially. However, as the solvents evaporate over the following weeks, the finish shrinks rapidly. It pulls down into the open wood fibres, leaving the surface looking starved and heavily pitted. A filler creates a structurally flat foundation, stopping this shrinkage entirely.
Choosing the Right Wood Grain Filler for Walnut
Not all pastes are created equal. The product you choose dictates your curing time and the final clarity of your piece.
| Filler Type | Shrinkage Rate | Curing Time | Best Application |
|---|---|---|---|
| Water-Based Filler | Moderate (May need 2 coats) | Fast (2-4 hours) | Quick DIY projects, low-odour needs |
| Oil-Based Filler | Low | Slow (24-48 hours) | Traditional antique restorations |
| Epoxy Pore Filler | Zero | Medium (12 hours) | Luthiery and high-end modern gloss |
| Clear Gel Filler | Moderate | Fast (1-2 hours) | Preserving the natural, un-tinted wood look |
Water-Based Grain Fillers (The Quick & Easy Route)
Water-based options are brilliant for the fast-paced UK workshop. Products like Timbermate Wood Filler – Walnut dry incredibly quickly and emit almost zero VOCs. The trade-off is higher shrinkage. Because water evaporates faster than oil, you will almost certainly need to apply two coats to pack the trenches fully flush.
Oil-Based Grain Fillers (The Traditional Choice)
Traditional oil-based pastes offer superior workability. They give you a massive “open time” to work the slurry deep into the timber without it tacking up beneath your scraper. They also accept subsequent oil stains beautifully. The downside? You must wait at least 48 hours in a cold British workshop before you can safely sand them.
Epoxy Pore Fillers (The Luthier’s Secret)
Guitar makers demand absolute perfection. For a true glass-smooth finish, an epoxy pore filler like Z-Poxy Finishing Resin is unmatched. It cures via a chemical reaction rather than solvent evaporation, meaning it suffers strictly zero shrinkage. It locks the grain down permanently in a single application.
Clear vs. Tinted Wood Grain Filler for Walnut: Aesthetic Considerations
You face a crucial aesthetic choice here. A clear grain filler like Aqua Coat Clear Grain Filler maintains the precise natural colour of the board. Conversely, a tinted wood filler actively highlights the grain pattern. Crucial rule: Always tint your filler 10% darker than the surrounding wood. Dark pores look like natural shadows; light pores look like trapped dust.
Step-by-Step: How to Apply Wood Grain Filler to Walnut
Application is a messy, mechanical process. Preparation and timing are your greatest assets here.
Step 1: Surface Preparation and Sanding
You must sand the raw timber flawlessly up to 220-grit. Any scratches left by 150-grit paper will act like artificial pores, catching the dark paste and highlighting your poor sanding technique. Vacuum the board meticulously. Compressed air is even better to blast the microscopic sawdust out of the vascular channels.
Step 2: The Crucial Washcoat (Sanding Sealer)
Never apply filler to raw walnut. You must apply a protective sanding sealer / washcoat first (often a heavily thinned shellac). This seals the flat surface of the wood. Without it, the dark dyes in the filler will bleed directly into the surrounding timber, resulting in a heavily discoloured, muddy appearance. For deeper insights into sealing, review our guide on preparing raw timber for finishing.
Step 3: Packing the Pores
Thin your chosen paste until it resembles thick pancake batter. Pour a puddle onto the wood. Using a plastic scraper or an old credit card, aggressively execute a squeegee application. Force the material diagonally across the grain. Driving it across the grain ensures you pack the trenches full, rather than just scooping the material back out.
Step 4: Removing the Excess (The Burlap Trick)
Wait until the filler “flashes off” and loses its wet sheen (usually 10 to 15 minutes for water-based). Take a square of coarse hessian or practice heavy burlap rubbing across the grain. The coarse fibres effortlessly sheer the excess paste off the flat surface without digging down into the packed pores.
Step 5: Level Sanding and Evaluating
Once fully cured, proceed with level sanding using 320-grit paper on a hard, flat block. You are sanding away the thin veil of filler left on the surface until you hit the washcoat underneath. Wipe the board with white spirit. If you see tiny dimples reflecting in the wet surface, the filler has shrunk. You must apply a second coat.
3 Common Mistakes to Avoid When Filling Walnut Pores
Even seasoned woodworkers occasionally misstep during this chemical waiting game.
1. Skipping the Sanding Sealer (Muddying the Grain)
I cannot stress this enough. If you rub a dark brown paste into raw, porous walnut, you will dye the entire board an ugly, opaque brown. The washcoat acts as a barrier, ensuring the filler only sticks inside the deep physical voids.
2. Impatience with Drying Times (Trapped Solvents)
If you trap uncured oil-based filler beneath a hard lacquer topcoat, the trapped solvents will eventually force their way out. This causes the topcoat to blister, cloud, and ultimately fail. Wait the full 48 hours. If the sandpaper gums up instantly, the filler is not dry.
3. Sanding Too Aggressively (Pulling the Filler Out)
Use a hard block and fine paper. If you use a soft foam sanding pad, it will conform to the microscopic dips in the wood and literally scoop the fresh filler right back out of the pores. Let the chemical properties of the Wood Grain Filler for Walnut do the heavy lifting, not your elbow grease. For a deeper dive into the chemical interactions of finishes, the Woodworker’s Institute provides excellent peer-reviewed data.
People Also Ask (PAA)
Can I use regular wood putty instead of grain filler on walnut?
No, you absolutely cannot. Standard wood putty is a thick, structural dough designed to bridge large physical gaps, screw holes, or torn-out knots. Grain filler is heavily thinned and heavily pigmented, engineered specifically to pack into microscopic biological pores without obscuring the beautiful figuring of the timber.
Should you stain walnut before or after applying grain filler?
You must dye or stain the raw wood first. Once the stain is dry, apply your protective sanding sealer to lock the colour in. Only then do you apply the tinted grain filler to pop the pores. Finally, you move on to your protective topcoats. Applying stain over filler often results in patchy, uneven absorption.
Do I really need to fill the grain if I’m using a matte finish?
Not necessarily. Grain filling is strictly essential for high-gloss, mirror-like reflections where every microscopic dip is magnified by the light. Matte or satin finishes naturally diffuse light and hide surface imperfections. In fact, an open-pore satin finish is highly tactile and incredibly popular for modern Scandinavian-inspired furniture.
Conclusion
The pursuit of a flawless surface is a test of patience. The right Wood Grain Filler for Walnut fundamentally transforms the timber from a rustic, heavily textured board into a refined, museum-quality surface. Remember to lock the raw wood with a washcoat, pack the pores aggressively, and allow ample curing time before your final sanding. Have you recently tackled an open-pore wood project in your workshop? Let us know which filler you trusted to get the job done.